Crochet baby sleepers and slippers are the kind of project that feels both practical and meaningful. They are small enough to finish without weeks of effort, yet important enough to become keepsakes. For beginners, they offer a perfect mix of skill-building and instant satisfaction. You get to practice shaping, smooth edges, and consistent tension, all while creating something that can actually be worn.
In the tutorial you shared, the focus is on building the base portion first, then using the same shaping logic to create multiple baby sizes. That approach is helpful because it teaches you how sizing works instead of making you memorize separate instructions for every age. Once you understand how the foundation length relates to the middle section and the two shaped ends, you can confidently make pairs for newborns through the first year.
This article explains the process in a beginner-friendly way without walking through exact stitch-by-stitch directions. You will get the overall workflow, how the sizing chart is structured, and the practical tips that help you end up with two matching pieces.
Materials Needed
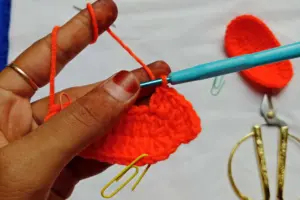
Based on the video, these are the supplies used to crochet the sole base for baby sleepers or slippers. Keeping your materials consistent helps your pair come out the same size and shape.
-
Baby-friendly yarn in a light weight category suitable for small garments
-
Crochet hook that matches the yarn recommendation
-
Stitch markers
-
Scissors
-
Darning needle
A helpful note for beginners is to choose a yarn that feels soft against skin and has a bit of resilience. That makes the finished baby footwear comfortable and easier to wash and reuse.
Abbreviations
Even when a tutorial explains everything out loud, abbreviations are still useful because they show up in charts, patterns, and notes. The following terms are the most relevant to this project style, written in US terminology.
-
ch – chain
-
hdc – half double crochet
-
sc – single crochet
-
inc – increase
-
sl st – slip stitch
-
st – stitch
If you are brand new, it helps to remember that increases are what create the curved ends, while the straight middle section is what controls the length.
Understanding the Sizing Method
One of the most useful ideas in this tutorial is that the shaping steps stay consistent across sizes. What changes is the starting length and the number of stitches in the middle section. In simple terms, the ends of the sole are formed using the same increase strategy, while the center grows or shrinks depending on the baby’s age.
The tutorial covers five sizes and explains them using a chart. This is valuable because it encourages you to choose a size with intention rather than guessing. It also makes it easier to adjust if the baby has a wider foot or if you prefer a roomier fit for socks.
Why a Flexible Foundation Matters
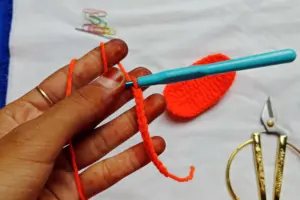
Instead of starting with a basic beginning chain, the tutorial uses a foundation method that naturally stretches. This matters for baby footwear because the sole needs to flex as the baby moves. A rigid start can make the sole feel tight and can also cause visible gaps near the edge.
A flexible foundation also improves the look of the finished sole. It supports smoother edges and helps the middle section stay even, which is important when you later build the sides of the sleeper or slipper.
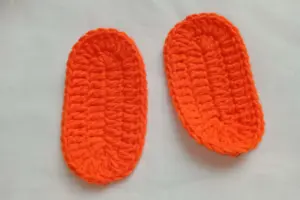
Shaping the Sole with Balanced Curves
The sole is built with two distinct ends and a straight middle section. The curved end near the toes is wider, while the heel area is shaped a little narrower. This subtle difference is what gives the sole a more natural foot-like silhouette.
Beginners often worry that the shape looks uneven during the first stages. That is normal. The base can look slightly off until the next sections reinforce the curve and the stitch placement becomes more defined. Using stitch markers in key positions makes this process easier because it gives you clear reference points as the shape grows.
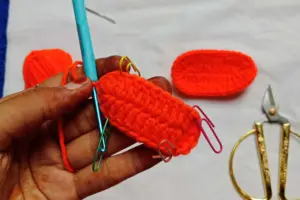
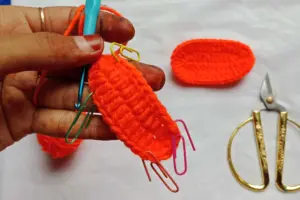
Using Stitch Markers for Accuracy
Stitch markers are one of the best tools for beginner success in shaped projects. In this tutorial, they help identify important positions along the center section so you do not lose track as the sole curves around.
Markers also help reduce counting fatigue. Instead of recounting the entire sole repeatedly, you can focus on the zones between markers. This keeps your shaping consistent and helps prevent mistakes that can change size or distort the outline.
Keeping Both Soles the Same Size
The tutorial includes a practical tip that many beginners overlook. Make both soles close together, ideally back-to-back, rather than finishing the entire first sleeper and starting the second later.
This is because your tension can shift from one day to the next. Even small changes in how tightly you hold the yarn can create a difference in size. By making both soles in the same sitting or within the same short timeframe, you greatly increase the chance that they will match.
Size Chart Summary for Newborn to 12 Months
The tutorial explains five baby sizes and shows how each one follows the same shaping logic. The main difference is the starting length and the number of stitches that run through the middle of the sole. As the size increases, the center portion becomes longer, and the total stitch count around the edge increases as well.
Here is the sizing information described in the video, rewritten in a simple way for quick reference.
-
Newborn
-
Center stitches: 4
-
Total stitches around the sole at the end: 38
-
-
3 months
-
Center stitches: 5
-
Total stitches around the sole at the end: 40
-
-
6 months
-
Center stitches: 7
-
Total stitches around the sole at the end: 44
-
-
9 months
-
Center stitches: 9
-
Total stitches around the sole at the end: 48
-
-
12 months
-
Center stitches: 11
-
Total stitches around the sole at the end: 52
-
A practical way to think about this is that the shaped ends stay consistent in concept, while the center section is what scales the sole longer as the baby grows.
How to Use the Chart Without Getting Confused
Charts can feel intimidating when you are new, but this one is beginner-friendly because it is based on a repeatable structure. The tutorial emphasizes that the first and last stitches of the foundation are used for shaping, while the stitches in the middle form the straight portion that creates length.
When you read the chart, focus on two things.
-
The number of foundation stitches for your chosen size
-
The number of center stitches you will maintain between the shaping points
If you keep those two numbers consistent, the rest of the process stays the same and your sole will naturally form the correct outline.
Why the Toe Area Is Shaped Wider Than the Heel
A baby’s foot is not the same width from end to end. The tutorial reflects this by shaping the toe area more generously, while keeping the heel slightly narrower. This gives the sole a more natural look and a better fit once the upper portion of the sleeper is added later.
This difference also helps the finished slippers stay on the baby’s foot. A heel that is too wide can slip off, while a toe area that is too tight can feel restrictive. Balanced shaping makes the piece look better and wear better.
Avoiding Gaps and Uneven Edges
When beginners work around a foundation, gaps can appear, especially along the center area. The tutorial gives an important tip about inserting the hook in the correct location to keep the middle of the sole looking clean and covered.
To keep your edges smooth, aim for these habits.
-
Keep yarn tension steady throughout the entire sole
-
Avoid pulling too tightly at turning points
-
Use stitch markers so you do not accidentally work into the wrong place
-
Pause occasionally and lay the sole flat to check the outline
These small checks prevent the most common beginner issues like twisting, uneven curves, and accidental extra stitches.
Consistency Tips That Make a Matching Pair
The video strongly recommends making both soles at the same time or as close together as possible. This is one of the most valuable tips in the entire tutorial because tension is the number one reason pairs do not match.
Here are a few additional strategies that help.
-
Use the same hook for both soles, not a different one from another kit
-
Crochet in the same sitting posture if possible, because it affects tension
-
Count totals at key checkpoints so you catch errors early
-
Keep the first sole nearby to compare shape as you work the second
If your second sole looks slightly different, do not panic. Small variations can often be corrected later when the upper is added, but it is best to stay consistent from the start.
What Comes After the Sole
This tutorial focuses on the sole portion only, which is the foundation of baby sleepers or slippers. Once you have two soles, you can attach almost any upper design.
Common next steps in baby sleeper construction include:
-
Building a short side wall around the edge of the sole
-
Shaping the toe cover area for warmth and fit
-
Adding a cuff or strap to help the slipper stay on
-
Finishing with neat edges and woven-in ends for comfort
Learning to make the sole well gives you the freedom to experiment with many different styles without starting from scratch each time.
Summary
Crochet baby sleepers begin with a well-shaped sole that balances comfort, flexibility, and clean construction. The tutorial makes sizing approachable by showing that the shaping approach stays the same across five sizes, while the center section changes to create length. With the right materials, careful use of stitch markers, and consistent tension, even beginners can produce a neat pair.