Crochet cacti have become a beloved project for beginners because they offer the charm of handmade décor without requiring complex shaping. Even with minimal instructions in the original video, the visual sequence shows a clear construction process: a rounded cactus body, a compact base or pot, occasional surface ridges, and often a tiny bloom on top. These elements come together to create a sturdy, sculptural piece that resembles a real cactus but with the softness and personality of yarn.
What makes this project particularly appealing is its forgiving structure. Because a cactus naturally has curves and ridges, small inconsistencies blend easily into the final shape. This makes it an excellent confidence-building project for newer crocheters who want to practice working in the round, shaping with stuffing, and assembling multiple parts.
This guide breaks the process into approachable steps, focusing on the overall flow rather than numerical stitch counts. You will gain clarity on how the cactus body is formed, how the pot or base supports it, and how small embellishments complete the final look.
Materials Needed
Although the video transcript contains sound only, the visual cues show the standard tools used for crochet cactus projects. The following list reflects materials commonly used in the video and typical beginner cactus tutorials:
- Soft acrylic or cotton yarn in a main cactus color
- Additional yarn for a pot, base, or decorative flower
- Small crochet hook appropriate for your yarn weight
- Fiber stuffing
- Yarn or darning needle for assembly
- Scissors
- Optional stitch marker
These materials allow you to create a shaped cactus, a stable pot, and small decorative elements.
Abbreviations
US crochet terminology is referenced.
MR
: Magic ring
SC
: Single crochet
INC
: Increase (two stitches in one space)
DEC
: Decrease (two spaces worked together)
SL
: Slip stitch
BLO
: Worked into the back portion of a stitch
These abbreviations support the general explanation of shaping and assembling your cactus.
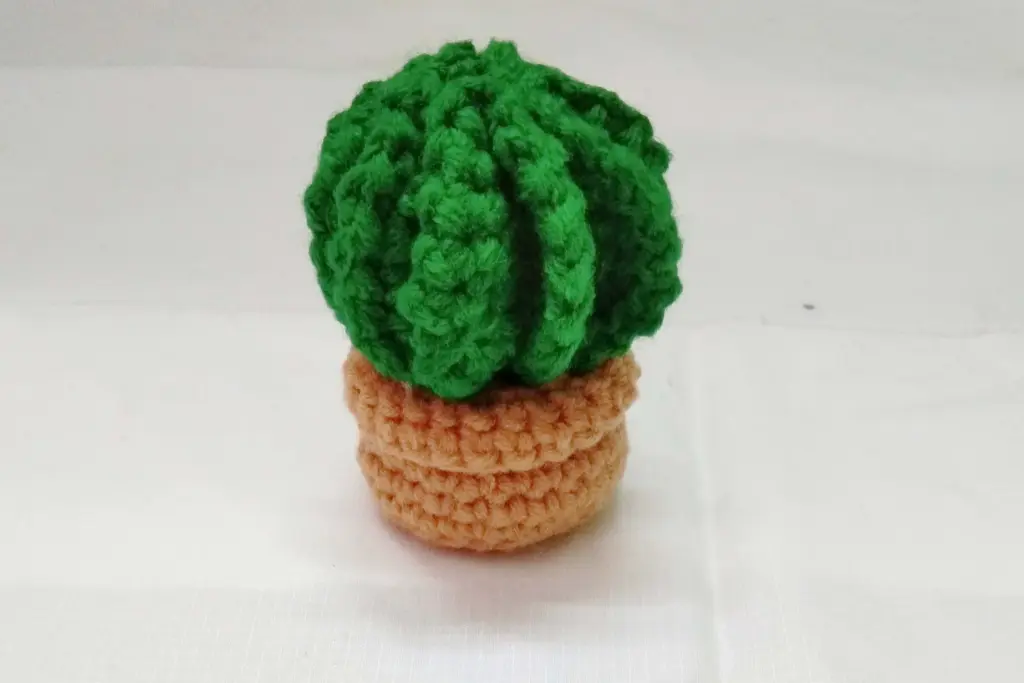
Shaping the Cactus Body
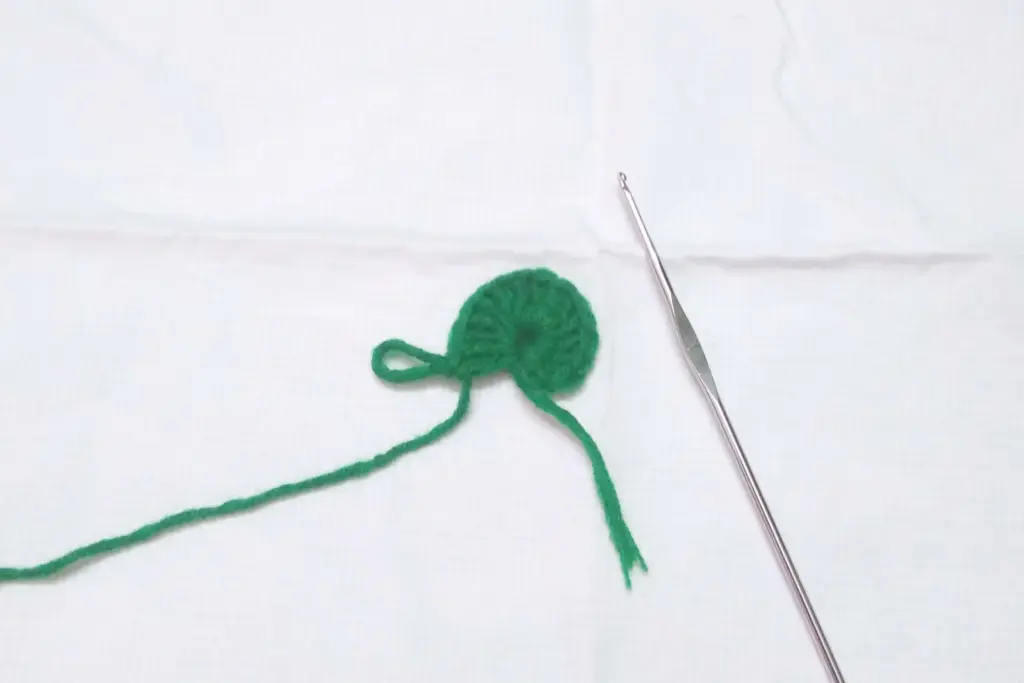
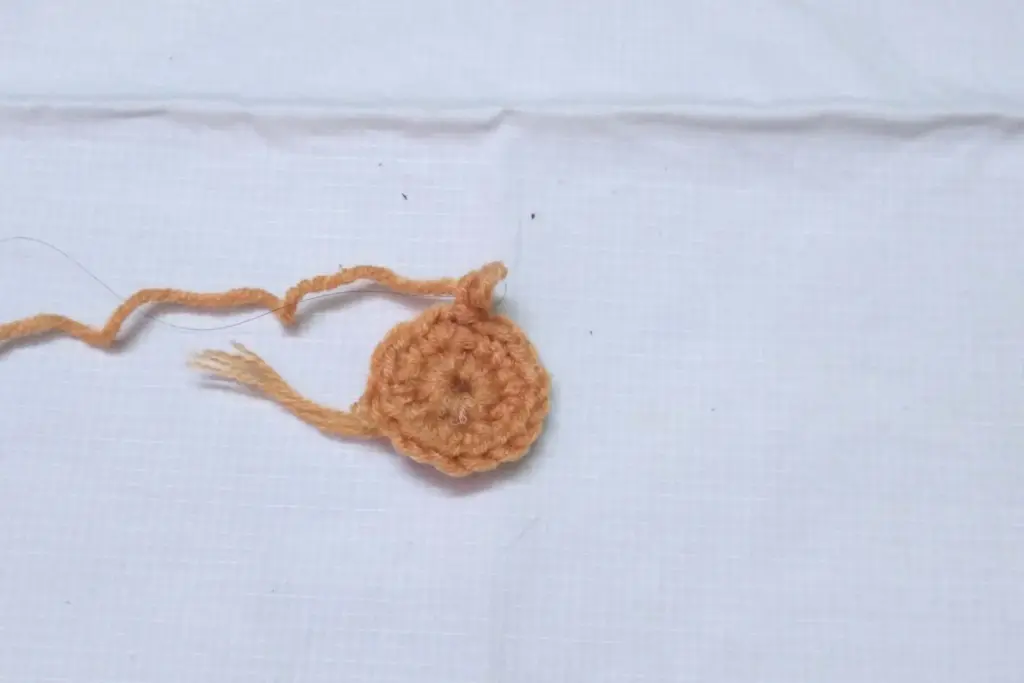
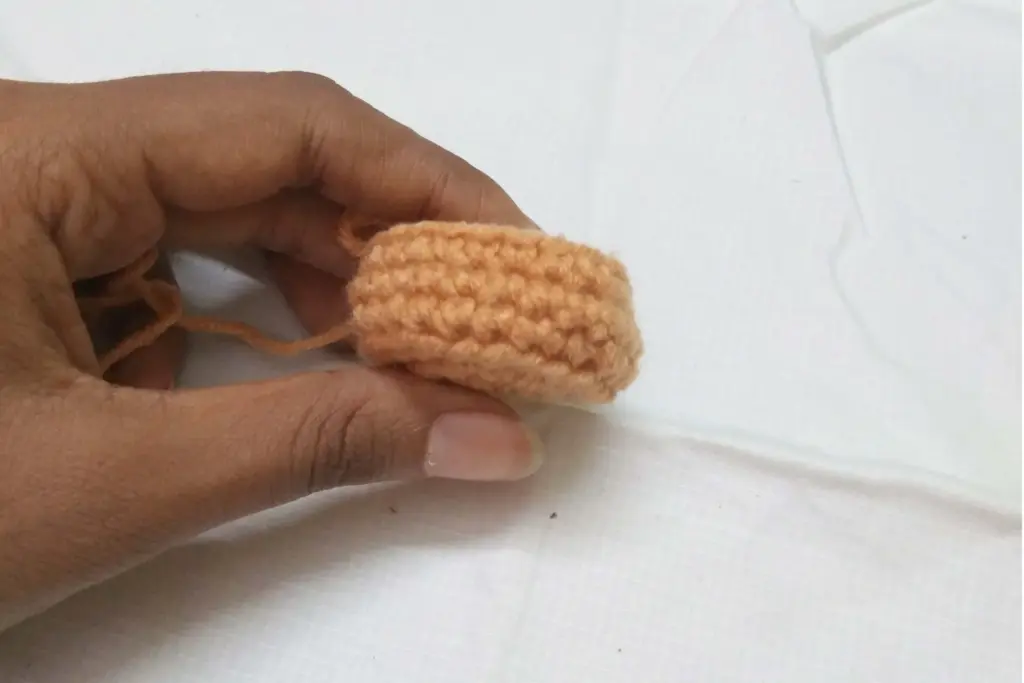
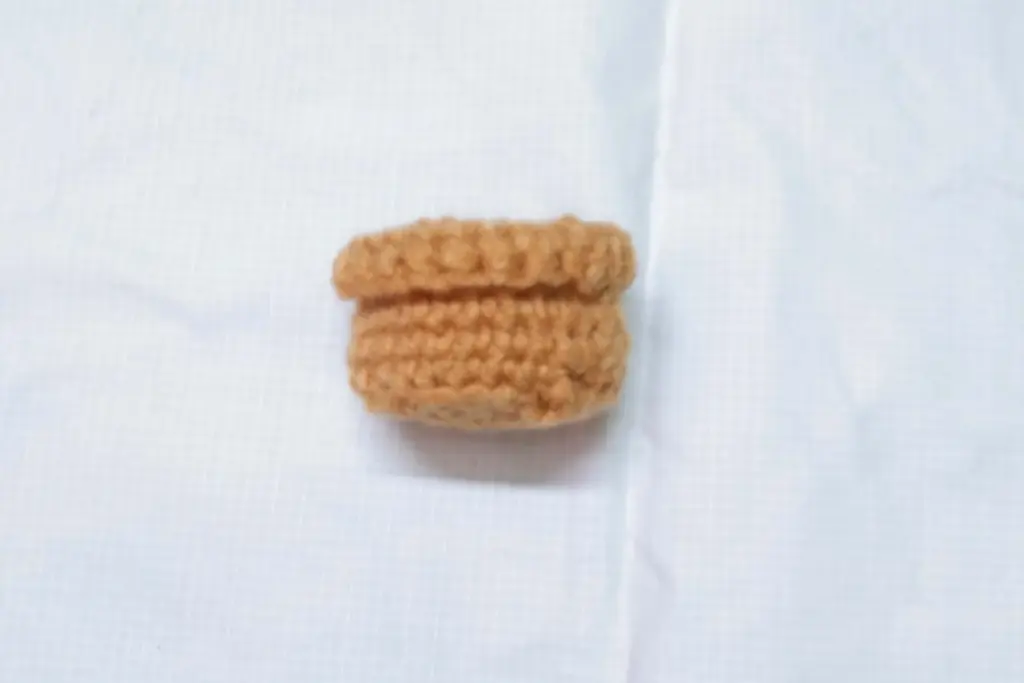
The main body of the cactus forms the heart of the project. It is typically built by starting with a tightly closed circular base and gradually expanding outward to create a smooth, rounded bottom. As the shape grows upward, the sides become a cylinder or oval dome depending on how tall you choose to make it.
The structure remains firm because the body is worked continuously in the round, allowing the fabric to curve naturally. Once the sides reach the desired height, the upper portion narrows again. Stuffing is added before the final closing to maintain volume. The goal is a soft, plump form resembling a living cactus segment, with no sharp edges or visible seams.
Creating the Base
Most crochet cactus designs include a small pot or grounding base. This base is created separately using slightly firmer construction so it can support the round cactus body. It usually begins as a flat disc and gradually widens before straightening to form a short bowl shape.
The pot and cactus body fit together snugly. The base may be lightly stuffed to help it stand or left unstuffed for a more compact appearance. By shaping the pot walls with simple increases and straight rows, beginners enjoy an easy introduction to forming containers in crochet.
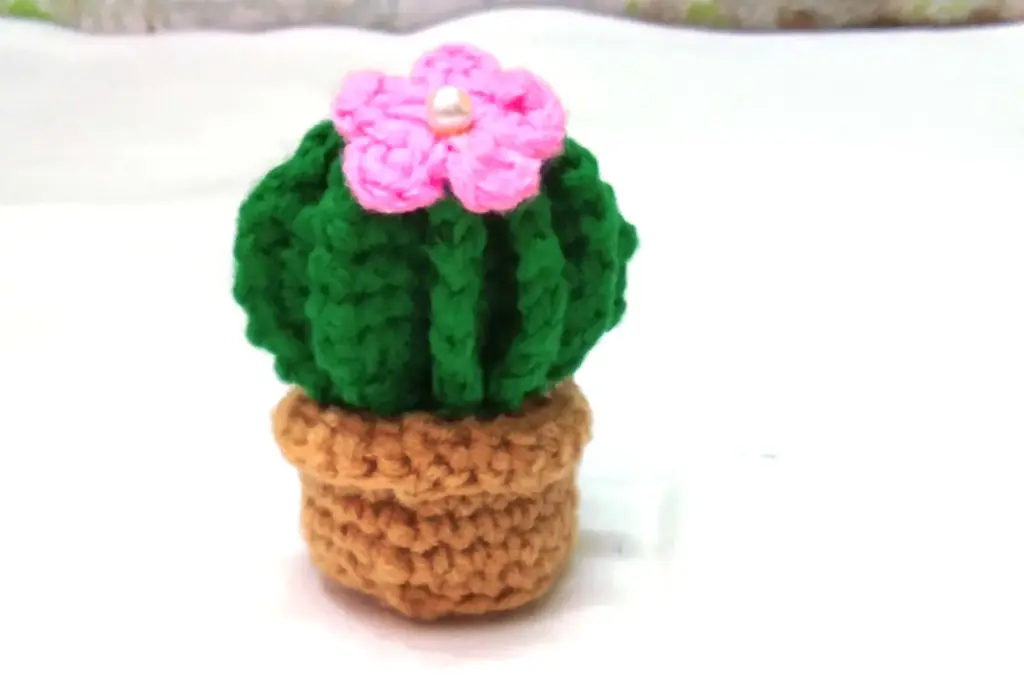
Adding Surface Texture
Cacti are known for their ridges, and this project incorporates them through simple texture techniques. One method is to work certain rounds using the back strands only, creating raised vertical lines along the sides. Another method is to add surface slip stitches after the body is complete, tracing gentle valleys that give the cactus definition.
These subtle textures enhance the appearance without complicating the pattern. Even beginners can achieve realistic detailing by following the natural curve of the piece as they add their surface lines.
Forming Additional Cactus Arms
Many cactus designs include small offshoots or arms that grow from the main body. These components are made as miniature versions of the main shape: small rounded segments that are slightly stuffed and then attached to the side.
The join is typically done using a yarn needle to weave the two edges together invisibly. When these little arms are placed at different heights, the cactus gains personality and a playful, sculptural look. They are optional, but they make the project feel more dynamic.
Adding a Crochet Flower
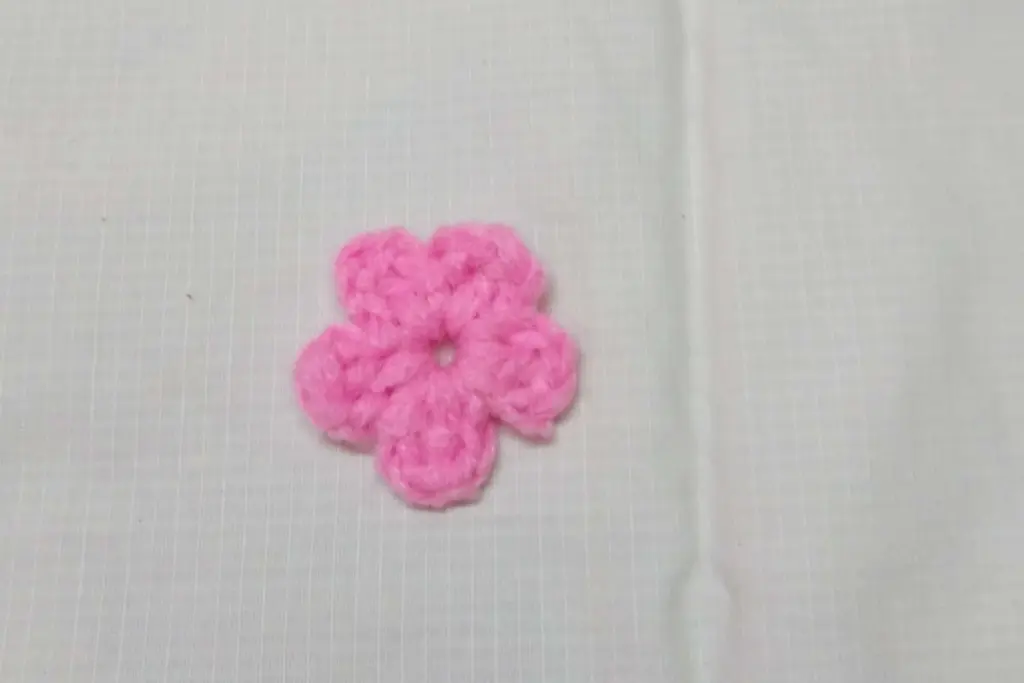
A tiny flower adds charm to the top of the cactus. The bloom can be as simple as a few rounded petals worked in a small circle, or even just a gathered cluster of short stitches. Because the flower is small, it works up quickly and introduces beginners to miniature crochet techniques.
Once completed, the flower is sewn or glued to the cactus top. The contrast between the vibrant bloom and the soft cactus body makes the overall piece pop visually.
Assembling the Cactus
Once the cactus body, pot, and any additional pieces are finished, assembly becomes a straightforward but important step. The rounded cactus body is positioned inside or atop the pot section, depending on the design. A bit of stuffing can be added between the two pieces to ensure a tight fit.
Using a yarn needle, the bottom of the cactus is stitched securely to the pot’s upper edge. This anchoring creates a stable structure that will not wobble or tilt. If the cactus includes smaller side arms, they are added at this stage by stitching their bases directly into the main body with small, discreet passes of the needle.
This part of the process is flexible. You can adjust placement, angle, or the number of small arms to give each cactus a unique look.
Finishing Touches
The final stage is where the cactus comes to life. If you included surface ridges, you can enhance them by gently adjusting the tension of the lines with your fingertips. A small flower or cluster placed on the top adds character and color.
You might also choose to stitch or glue a felt circle to the bottom of the pot for a tidy finish. If the pot feels unstable, adding a bit of weight—such as a pebble or small bead—before sewing it closed can help it stand upright.
These finishing touches ensure that your cactus not only looks appealing but also feels sturdy and polished.
Style Variations
Although the basic construction method is similar across most crochet cactus patterns, you can create a wide range of styles by adjusting simple elements:
- Lengthen the cylindrical body for a tall cactus
- Add multiple small arms for a clustered look
- Crochet the pot in a striped or textured pattern
- Make a flat base instead of a pot for appliqué use
- Use variegated yarn for natural color shading
- Create a group of tiny cacti in varying sizes
Small adjustments like these give your cactus more personality, allowing you to tailor the project to your own aesthetic.
Crochet Cactus Structure Table
Below is a detailed comparison table outlining each main component, its purpose, and key features.
| Component | Materials | Construction Technique | Function | Difficulty Level | Notes |
|---|---|---|---|---|---|
| Cactus Body | Main color yarn + stuffing | Worked in the round, shaped with increases and decreases | Forms the main structure | Beginner | Soft dome shape hides small inconsistencies |
| Pot/Base | Complementary yarn | Flat disc transitioning into a bowl shape | Supports cactus body | Beginner | May be weighted for stability |
| Texture Ridges | Same yarn as body | Back-loop rows or surface slip stitching | Adds definition and realism | Beginner | Can be subtle or bold |
| Side Arms | Body yarn + stuffing | Miniature rounded segments | Adds visual interest | Beginner | Optional but appealing |
| Flower | Bright contrasting yarn | Small petal cluster | Decorative top accent | Beginner | Quick to make |
| Assembly | Needle + yarn | Stitching parts together | Holds structure firmly | Beginner | Flexible placement |
Tips for Beginners
- Keep your tension gentle when shaping rounded pieces to prevent gaps.
- Stuff the cactus body gradually to avoid lumps.
- Use a stitch marker to keep track of where each round begins.
- When attaching arms, pin them in place first to preview placement.
- Surface ridges look best when added after stuffing the body.
- Work with smooth yarn for clear stitch definition, especially in the pot.
- Make multiple small cacti using leftover yarn—it’s an excellent scrap project.
These small practices help create a clean, structured result even for first-time makers.
Summary
A crochet cactus is an ideal beginner project because it combines simple construction with creative flexibility. The basic cactus body teaches essential shaping techniques, the pot offers a gentle introduction to container forms, and the optional ridges and flowers provide fun embellishment opportunities.
Whether displayed on a desk, gifted as a handmade plant, or grouped into a decorative set, these cacti bring charm and personality to any space. With minimal materials and a forgiving structure, they make it easy for newcomers to enjoy success while practicing foundational crochet skills.
If you’d like, I can help create a printable pattern-style version, add step-by-step diagrams, or adapt this cactus into a keychain or mini version.