

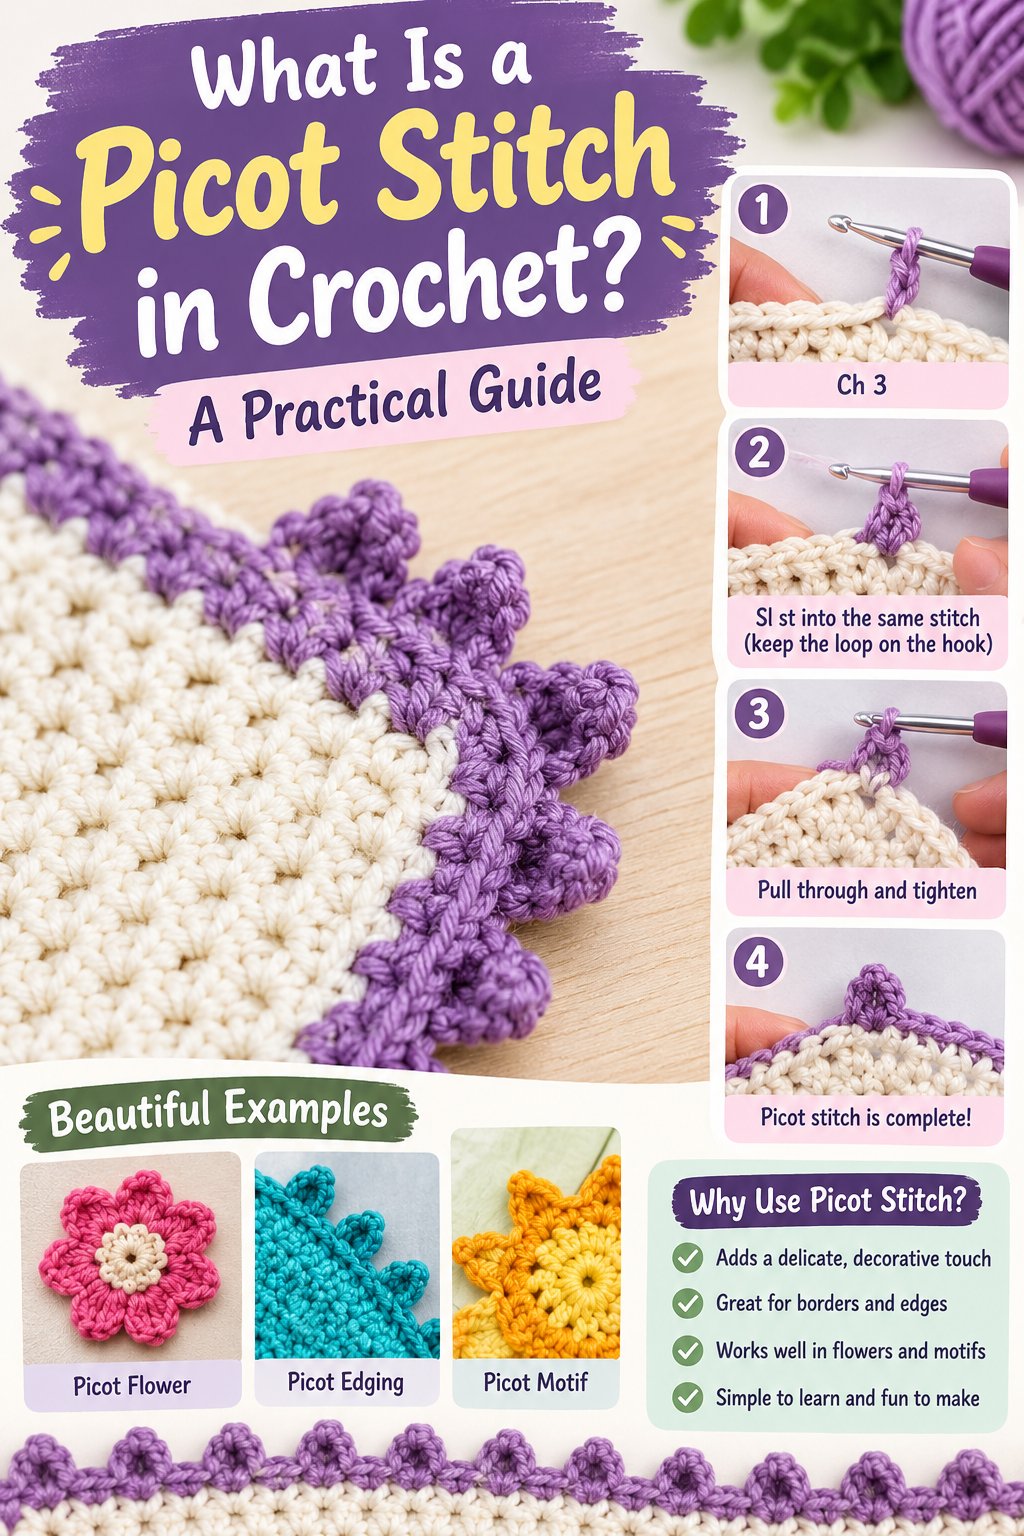
A picot stitch in crochet is a small decorative loop made from chain stitches and a closing stitch. It creates a pointed, textured, lace-like projection along an edge, usually after a single crochet or other anchor stitch. A picot adds ornament and surface detail, but it does not provide the structural strength of a border.
The word is usually pronounced “pee-co.” Crochet patterns may abbreviate the instruction as picot, p, or spell out a sequence such as ch 3, sl st in base. Pattern terminology varies, so the written definition in the pattern takes priority over an abbreviation.
Key Facts
A classic picot usually uses 3 chains and a slip stitch.
The loop can close into the first chain or back into the anchor stitch.
A picot is decorative, flexible, and normally placed along an edge.
Three to five base stitches between points creates moderate spacing.
Cotton and smooth acrylic show the shape more clearly than fuzzy yarn.
Practice normally takes 5-10 minutes, but consistent tension determines the final appearance.
What Is a Picot Stitch in Crochet?
A picot stitch is a compact crocheted loop that projects from a row, round, or finished edge. The crocheter works upward with chains, closes the chain arch with a slip stitch or single crochet, then resumes the border. The result may resemble a tiny tooth, bead, teardrop, or rounded bump depending on the closure.
A picot is an edging element rather than a complete fabric stitch. It cannot replace a foundation chain, turning chain, seam, button loop, or load-bearing border. Its value comes from controlled irregularity: each point interrupts a smooth edge with a repeatable decorative shape.
The technique appears in doilies, crocheted lace, shawls, blanket borders, cuffs, collars, ornaments, and amigurumi accessories. On a fine cotton thread, a 3-chain point may look like lace. On bulky wool, the same sequence can become a prominent nub.
What Does a Picot Look Like?
A picot looks like a small loop or point extending beyond the edge. A tight closure produces a sharper triangular point, while a closure made farther away from the anchor produces a rounder loop with more visible opening.
Finished size depends on more than the chain count. Hook size, yarn thickness, chain tension, closure location, and blocking all alter the silhouette.
| Construction | Typical chain count | Typical visual height | Common use |
|---|---|---|---|
| Tiny picot | 1-2 chains | 2-4 mm | Fine lace, sock cuffs |
| Standard picot | 3 chains | 5-8 mm | Shawls, blankets, garment edges |
| Medium picot | 4-5 chains | 8-14 mm | Doilies, decorative collars |
| Large picot | 6-9 chains | 15-30 mm | Open mesh, theatrical or gothic lace |
These dimensions are typical working estimates, not fixed standards. A lace-weight cotton chain may measure less than a worsted-weight acrylic chain made with the same count.
How Does the Stitch Work?
A picot works by converting a short vertical chain into a closed loop attached to a horizontal edge. The base stitch supplies the anchor, the chain supplies height, and the closing stitch determines whether the projection appears sharp, rounded, firm, or loose.
The basic movement is simple, but the insertion point controls the result. Closing into the wrong strand can twist the loop, leave a gap, or pull the base stitch out of alignment.
How to Make a Standard Ch-3 Picot
Use the following method when a pattern says “standard picot” without specifying another closure.
- Work the border until the location of the point.
- Make the base stitch, usually a single crochet, where the point will attach.
- Chain 3 with relaxed, even tension.
- Bend the chain toward the base stitch without twisting it.
- Insert the hook into the designated closing point.
- Yarn over and pull through every loop on the hook to make a slip stitch.
- Work the next border stitch in the next base stitch.
- Repeat at the stated interval.
Some patterns place the picot before the anchor rather than after it. The construction is still the same: a short chain rises from an edge, closes, and reconnects with the border.
Where Should the Hook Go?
The cleanest firm closure often uses the front loop and the adjacent front vertical bar of the base single crochet. This insertion catches two visible strands and keeps the point upright. It is especially useful on blanket borders that receive handling.
Closing into the first chain creates a more open, independent loop. Closing into the top of the anchor stitch creates a compact point but may be harder to insert into cleanly.
| Closure location | Shape | Stability | Best situation |
|---|---|---|---|
| First chain | Open teardrop | Medium-low | Soft lace and airy shawls |
| Front loop only | Narrow point | Medium | Light decorative edging |
| Front loop plus vertical bar | Sharp point | High | Blankets and garment hems |
| Anchor stitch top | Compact bump | Medium-high | Dense borders |
| Single crochet closure | Broad bump | High | Rounded, low-lace edging |
The first chain is counted from the hook, not the loop currently sitting on the hook. Miscounting this location is a common reason a point appears too small.
What Are the Main Picot Variations?
The main variations differ in chain height and closure method. A 3-chain slip-stitch picot creates the familiar pointed edge, while a larger chain produces an elongated loop and a single-crochet closure produces a wider bump.
Pattern writers do not use every term consistently. Read the complete stitch instruction when a pattern specifies “flat,” “closed,” “reverse,” or “large” picots.
- Standard picot: Usually 3 chains, closed with a slip stitch into the anchor or nearby chain.
- First-chain picot: The slip stitch enters the first chain, producing a softer teardrop.
- Large picot: Uses 5, 7, or more chains for an elongated projection.
- Flat picot: Uses a single crochet to close the loop, making a broad raised shape.
- Pointed picot: Uses a firm two-strand closure to preserve a sharp tip.
- Open picot: Leaves more space beneath the arch and suits lace motifs.
| Variation | Closing action | Edge effect | Main trade-off |
|---|---|---|---|
| Standard | Slip stitch, 3 chains | Small pointed dot | Requires accurate insertion |
| First-chain | Slip stitch into first chain | Loose teardrop | Can look floppy on heavy yarn |
| Large | Slip stitch after 5-9 chains | Tall open loop | Uses more yarn and stretches |
| Flat | Single crochet closure | Wide rounded bump | Less pointed than a slip stitch |
| Open | Loose chain arch | Airy lace opening | More vulnerable to snagging |
A larger point is not automatically more decorative. On dense fabric, long chains can bend sideways because the edge lacks room to support them.
Which Picot Size Should You Use?
Choose picot size by matching chain height to yarn thickness, fabric density, and the amount of handling the edge will receive. Three chains are a reliable starting point for medium-weight yarn, while fine thread may need 2 chains and bulky yarn may need 3 or 4.
The correct size is the one that remains visible without overpowering the edge. Make a six-point sample before committing to a full border.
| Project or yarn | Suggested chain count | Suggested spacing | Practical result |
|---|---|---|---|
| Lace-weight cotton doily | 2-3 | Every 2-3 stitches | Fine, crisp points |
| Sport-weight shawl | 3-4 | Every 3-5 stitches | Visible but flexible edge |
| Worsted-weight blanket | 3 | Every 4-6 stitches | Stable, readable points |
| Bulky scarf | 3-4 | Every 5-8 stitches | Broad decorative teeth |
| Baby garment | 2-3 | Every 3-4 stitches | Small edge with fewer snags |
Spacing is measured in base stitches between picots, not in chain stitches within the loop. If a pattern says “picot every 4 stitches,” work a point, then normally work the next four specified base stitches before making another point. Pattern conventions can differ, so follow the repeat diagram when available.
How Much Yarn and Time Does It Add?
A picot border typically consumes about 10-15% more yarn than a comparable flat edging when points are spaced every 3-5 base stitches. Large loops placed at every stitch can exceed that range, while occasional tiny points may add less than 5%.
A beginner often needs 5-10 minutes to understand the movement. On a finished edge, each standard point commonly adds 3-5 seconds compared with a plain border, although counting and correction can increase the total.
| Border plan | Typical added yarn | Added time per point | Typical practice sample |
|---|---|---|---|
| Tiny points, every 5 stitches | 3-7% | 2-3 seconds | 10 cm edge |
| Standard points, every 4 stitches | 10-15% | 3-5 seconds | 6-point swatch |
| Dense points, every 2 stitches | 15-25% | 4-7 seconds | 12-point swatch |
| Large points, every 3 stitches | 20-35% | 5-9 seconds | 6-point lace sample |
These are typical practitioner estimates rather than universal measurements. Fiber, hook size, chain length, and the border stitch change both consumption and speed.
How Do Yarn and Hook Choices Change the Result?
Smooth yarn and a hook that produces relaxed chains give the clearest picots. Mercerized cotton, combed cotton, smooth acrylic, and tightly spun wool preserve the outline, while mohair, brushed alpaca, eyelash yarn, and loose roving can hide the opening.
The hook should suit the main fabric unless the pattern specifies a separate edging size. A hook one size larger can make the chain easier to close, but it may also create a loose loop that fails to stand upright.
| Material or tool | Typical behavior | Adjustment | Suitable project |
|---|---|---|---|
| Mercerized cotton | Crisp, low halo | Keep standard hook | Doilies and lace |
| Smooth acrylic | Stable and visible | Block with water | Blankets and trims |
| Wool | Shapes well when wet | Avoid aggressive heat | Shawls and cuffs |
| Mohair or brushed yarn | Hides small openings | Use larger picots | Soft fashion edges |
| Small steel hook | Precise on thread | Maintain relaxed chains | Fine motifs |
| Large hook | Opens the loop | Check for floppy points | Airy borders |
The Craft Yarn Council’s standard crochet abbreviations identify ch as chain and sl st as slip stitch. Those abbreviations describe the actions, but they do not by themselves identify the exact picot closure location.
How Do You Space Points on a Straight Edge and Corner?
Picots look balanced when the repeat fits the edge rather than when the crocheter forces the same count everywhere. On a straight edge, place points at a regular interval; at a corner, use a corner point, extra spacing, or a smaller point to prevent crowding.
A practical starting rule is one standard point every 3-5 base stitches. For a corner, test the turning behavior on a sample because a rigid point placed directly at the bend may project inward or pull the corner upward.
| Edge situation | Starting arrangement | Risk if unchanged | Better adjustment |
|---|---|---|---|
| Straight blanket edge | Point every 4 stitches | Usually even | Keep the repeat |
| Tight inside corner | Point at corner | Point folds inward | Skip corner or use tiny point |
| Wide outside corner | No corner point | Corner looks empty | Add one larger point |
| Circular doily | Equal angular spacing | Stitch count may drift | Divide points by motif repeats |
| Garment neckline | Point every 3 stitches | Edge may stretch | Increase spacing near curves |
For circular work, count the complete repeat before beginning the final round. If the number of base stitches does not divide evenly by the chosen interval, redistribute the spaces gradually instead of placing two points side by side.
How Does a Picot Compare With Other Edgings?
A picot edging is best when the goal is a small lace-like accent rather than a rigid edge or broad scallop. Crab stitch creates a corded ridge, shell stitch creates a larger fan, and a blanket stitch border gives a quieter, more structured finish.
| Edging | Visual profile | Stability | Typical yarn use | Best application |
|---|---|---|---|---|
| Picot | Small pointed loops | Flexible | Medium | Shawls, lace, blanket trim |
| Crab stitch | Twisted cord | High | Low | Cuffs and anti-curl edges |
| Shell stitch | Wide fans | Medium-high | High | Baby blankets and skirts |
| Blanket stitch | Straight, clean ridge | Very high | Very low | Utility blankets and hems |
| Reverse single crochet | Dense rope | High | Low-medium | Firm garment or bag edges |
A picot cannot reliably stop severe curling because its loops add decoration without creating much lateral tension. A crab stitch or dense single crochet border is usually better when edge control is the primary requirement.
When Is a Picot the Wrong Choice?
Avoid a delicate point when the edge will catch frequently, rub against skin, or undergo heavy washing. A long loop on a baby blanket, bag, pet accessory, or sleeve can snag more easily than a compact corded edge.
A picot is also a poor choice for a highly structured placemat or a brim that must stay flat. The open projections may curl, stretch, or lose definition unless the yarn and finishing method support them.
How Do You Block and Finish the Points?
Blocking aligns the loops and can sharpen uneven points, but blocking cannot correct a wrong stitch count or a closure placed in the wrong strand. Wet blocking suits cotton and wool; steam blocking suits many acrylic projects only when the heat remains controlled.
For a washable item, pin each point outward on a blocking mat after wetting the edge evenly. Use rust-resistant pins and let the fabric dry completely before removing them. For acrylic, hover steam above the fabric and shape the points with a tool or gloved fingers, because direct heat can permanently flatten the yarn.
- Finish and weave in the border tail.
- Measure the edge while it is relaxed.
- Wet the fabric or expose it to controlled steam.
- Place pins at the tips of the picots.
- Check that the spaces between points match.
- Allow the project to dry or cool fully.
- Remove pins and inspect the corners.
| Fiber | Preferred finish | Approximate setting | Main caution |
|---|---|---|---|
| Cotton | Wet block | Room temperature water | Needs full drying |
| Wool | Wet block | Cool to lukewarm water | Avoid agitation and felting |
| Acrylic | Light steam | Steam held several cm away | Direct heat can melt shape |
| Polyester | Test steam first | Low heat only | Fiber response varies |
| Mohair blend | Gentle wet block | Cool water | Brushing can obscure points |
How Can You Repair an Uneven Picot?
Repair one uneven point by undoing back to the previous anchor, then rebuilding the chain with matching tension. If several points drift, count the base-stitch repeat before repairing because local correction may hide a larger spacing error.
A point that leans usually has one of three causes: a twisted chain, a closure that catches only one unintended strand, or a next anchor pulled too tightly. Blocking can improve mild leaning, but it cannot rotate a fundamentally misclosed loop.
What Mistakes Make Picots Floppy or Uneven?
The most common mistakes are tight chains, inconsistent base-stitch spacing, and closing into an unsuitable strand. Each problem changes the loop’s geometry, so adding more tension after the mistake usually makes the edge less even.
Expert insight: Many crocheters focus on chain tension but ignore the next anchor stitch. A tight anchor pulls the completed point sideways, even when the chain itself has the correct length.
| Symptom | Likely cause | Immediate fix | Preventive rule |
|---|---|---|---|
| Hook will not enter chain | Chain is too tight | Loosen the chain | Pull each chain to hook width |
| Point leans left | Closure catches wrong strand | Undo and recapture two strands | Close in a consistent location |
| Loop hangs down | Too many chains or loose tension | Reduce chain count | Test six points first |
| Border puckers | Points are too close | Increase spacing | Count base stitches aloud |
| Corner lifts | Point adds too much tension | Skip or reduce corner point | Sample the turn |
| Edge looks bare | Points are too far apart | Add a repeat | Compare visual intervals |
What Happens If You Skip the Next Anchor?
Skipping the next anchor leaves the decorative loop attached but fails to integrate the border repeat. The point may remain floppy, create a gap beneath itself, or cause the following stitches to shift by one position.
After closing a picot, identify the next base stitch before inserting the hook. A removable stitch marker can help on dark yarn, textured fabric, or a crowded final round.
Which Projects Benefit Most From This Edging?
Picots work especially well on shawls, doilies, baby blankets, cuffs, collars, and decorative home textiles. These projects display the outer edge and do not require the point to carry weight.
A standard point is a sensible first test for a shawl or blanket. Fine cotton and smaller points suit doilies, while a larger point can balance a wide openwork fabric.
| Project | Recommended point | Spacing | Finishing priority |
|---|---|---|---|
| Triangle shawl | 3-4 chains | Every 3-5 stitches | Block points outward |
| Cotton doily | 2-3 chains | Every 2-3 stitches | Pin exact symmetry |
| Worsted blanket | 3 chains | Every 4-6 stitches | Use firm two-strand closure |
| Garment cuff | 2-3 chains | Every 3-4 stitches | Check snag resistance |
| Table runner | 2-3 chains | Motif-aligned | Wet block flat |
| Bag edge | Tiny 1-2 chain points | Every 5-8 stitches | Prefer compact closures |
Expert insight: A point that looks delicate on a swatch can look oversized around a full blanket. Judge the edging from arm’s length as well as close up, because scale changes the perceived spacing.
How Can You Choose the Right Construction?
Choose the closure first when stability matters, then choose chain height according to yarn thickness. For a durable border, use a 3-chain loop with a two-strand slip-stitch closure; for an airy lace effect, close into the first chain and allow more space between points.
Use this decision sequence:
- Decide whether the edge needs structure or ornament.
- Select smooth yarn if point definition matters.
- Make six sample points using 3 chains.
- Compare 2, 3, and 5 base-stitch spacing.
- Test a corner or curve if the project contains one.
- Wash or block the sample if the finished item will be washed.
- Record the chain count, closure, and spacing before starting.
The sample prevents a costly mismatch. Six points use little yarn but reveal whether the edge curls, stretches, snags, or overwhelms the fabric.
Frequently Asked Questions About What Is a Picot Stitch in Crochet
Is a picot the same as a loop stitch?
No. A picot is a short chain loop closed into an edge, usually with a slip stitch or single crochet. A loop stitch creates elongated loops through repeated yarn wrapping or pulled strands within the fabric. Picots decorate the perimeter, while loop stitches usually alter the fabric surface or pile.
Can you make a picot without a slip stitch?
Yes. A single crochet can close the chain loop and create a wider, flatter bump. Some patterns also use a half double crochet or a taller stitch for a broad decorative projection, but the closure changes the height, firmness, and appearance, so it should not be substituted without testing.
Why does my picot keep curling?
A picot curls when chain tension is uneven, the yarn has strong twist, the point is too large for the edge, or the border has not been blocked. Make the chains slightly looser, reduce the chain count, and wet block natural fibers. Blocking will not fix incorrect spacing or a twisted closure.
How many chains should a crochet picot have?
Use 3 chains as the standard starting point. Use 2 chains for fine thread or a tiny garment trim, 4-5 chains for a more visible point, and 6 or more only when an elongated lace loop is intentional. Always test the point with the project’s actual yarn and hook.
Can picots be used on a blanket?
Yes. Picots suit blankets when the edge is decorative and the points are compact enough to resist snagging. A 3-chain point placed every 4-6 base stitches, closed through two strands of the anchor stitch, generally provides a stable starting design for worsted-weight yarn.
Are picots used in knitting too?
Knitting has decorative loops and cast-on or bind-off techniques that may resemble crochet picots, but the construction is different. A crochet picot is formed with chain stitches and a crochet closing stitch, so a knitting pattern’s “picot” instruction should not be assumed to use the same sequence.
Final Takeaway
A picot stitch in crochet is a small chain-and-closure loop that adds pointed, lace-like texture to an edge without providing major structural support. Start with 3 chains, space points every 3-5 base stitches, use a consistent two-strand closure for firmness, and block the finished edge when the yarn permits.